


1. On the Synology open the Control Panel then click on Shared Folder.
2. Click on Create and select Create Shared Folder.
3. Enter a share name (e.g. pbs). Disable recycle bin, if you wish.
4. Skip folder encryption.
5. Enable checksum. Do NOT enable file compression. Don’t enable a quota unless you want to.
6. Confirm settings.
7. Configure permissions. Give the ‘admin’ account read/write (yes, even if the actual admin account is disabled.)
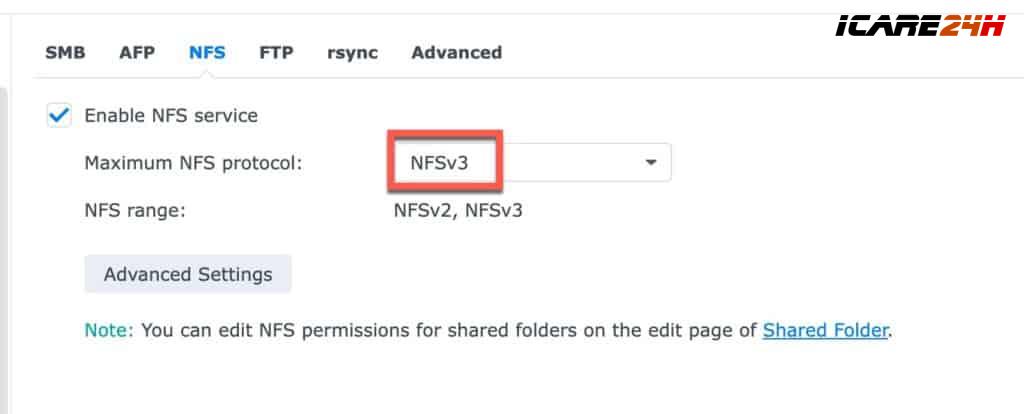
8. In the Synology Control panel to go File Services in the left pane.
9. Make sure Maximum NFS protocol is NFSv3. Click Apply.
8. In Control Panel -> Shared Folder select the PBS share and click Edit.
9. Click on the NFS Permissions tab. Click Create.
4. Add the IP address of your PBS server.
5. Change the Squash to No mapping. Make sure Security is sys.
6. Click Save. Click Save again.

7. Optional: Open the Snapshot Replication app. Configure a snapshot schedule to suit your needs. I suggest keeping 7 days worth of snapshots.
8. SSH into your PBS server. Create a mount directory (pick any name or path you want), and then change the permissions (very important).
mkdir /mnt/synology
chown backup:backup /mnt/synology
chmod 775 /mnt/synology
Copy

Note: If you run into permissions issues, a reader commented that removing the PBS NFS IP on the Synology side, re-adding it, then changing the permissions on /mnt/synology helped him.
13. Modify the command below to change your IP (Synology NAS) and volume paths as needed. This will append a line to /etc/fstab. Make sure the NAS path starts with volumex, as appropriate for your share location. Most of you will probably use volume1, as that’s the Synology default.
echo "10.13.2.230:/volume1/pbs /mnt/synology nfs vers=3,nouser,atime,auto,retrans=2,rw,dev,exec 0 0" >> /etc/fstabCopy
14. Test the mount. You should not get any permission denied or other messages. Silent completion means it worked.
Note: A tip from a reader mentioned he got a permission denied error with mount -a. He had to re-run the chmod 775 /mnt/synology command. So you might try that if you get stuck.
mount -aCopy
15. I suggest you verify that creating a file on the mount point results in a file on the NAS share. So run the following command, then go to the Synology UI and open the share and verify the file exists.
touch /mnt/synology/testfile.txtCopy
16. If all is well, run the following command to reload your fstab:
systemctl daemon-reloadCopy
17. Now that the NFS share is mounted, let’s reset the permissions again:
chmod 775 /mnt/synology